So, after playing with the Meccano bots, I decided that I wanted to see if I could develop a voice-directed-command interface for my robot…I really liked the idea of not needing a wire/cable tether or having to push buttons on a remote controller – with that, I needed two things: a voice front-end and a robot that could accept input from that front-end for movements – front, back, right, left, etc., and, other interaction that I could program – when were you created, how tall are you, etc…
Ideally, the front-end would be very robust, e.g., the ability to direct its actions and to interact at a level like the Amazon Echo devices…it would be great to integrate such capability into the robot so that it could be a fun companion for my grandson…
I thought maybe just developing an Arduino-based voice recognition (VoR)/text-to-speech (TTS) for the direction part and just bolting on an Amazon Dot might work, but I really wanted to see if I could use something like an Echo device to also send action commands to the robot so there was just the single interface…
I researched and discovered that you could create an Echo device using a Raspberry Pi (RPi)! If I could do that, then I should be able to use that RPi to send commands to the robot too – hmmm, this was getting interesting…unfortunately, there was a snag that worried me…
When I got into the finer points of the “AlexaPi” and the way its communications were done, it sounded like even if I could program things, the latency of voice-direction to result-action might be too long to make it practical…
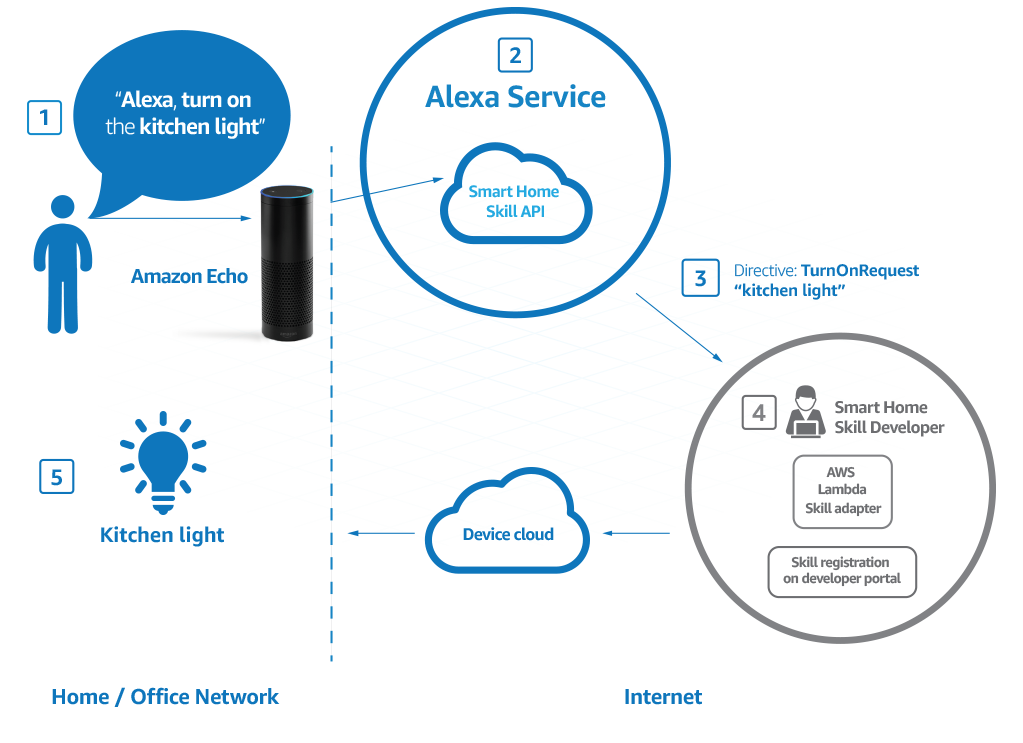
The Echo devices are not real smart themselves – they basically can only do VoR and TTS – i.e., the device hears what you say and sends a text translation of that to Amazon…Amazon processes the dialog and then sends a text message back to the device which is then converted into voice to let you know what to expect, or, ships a message off to a third-party – all the intelligent processing of the intent the device heard is done in the cloud…if the intent is asking for a third-party interaction, such as what’s the weather or play a Spotify song, Amazon hands that off and the third-party in turn communicates back to the Echo device over WiFi, sending a text message for TTS translation, or streaming a tune, or whatever…so, even if I could figure out how to create a robot command sequence to feed to the robot, the delay could be significant…
Then, I saw something that made me think I might be able to pull it off after all – Amazon was developing a new Echo service called an Alexa Gadget, whereby the action-result would be implemented by the Echo device for communication directly to another device nearby via Bluetooth…hmmm, let’s build one!
AlexaPi. The process to build an AlexaPi is pretty straight-forward:
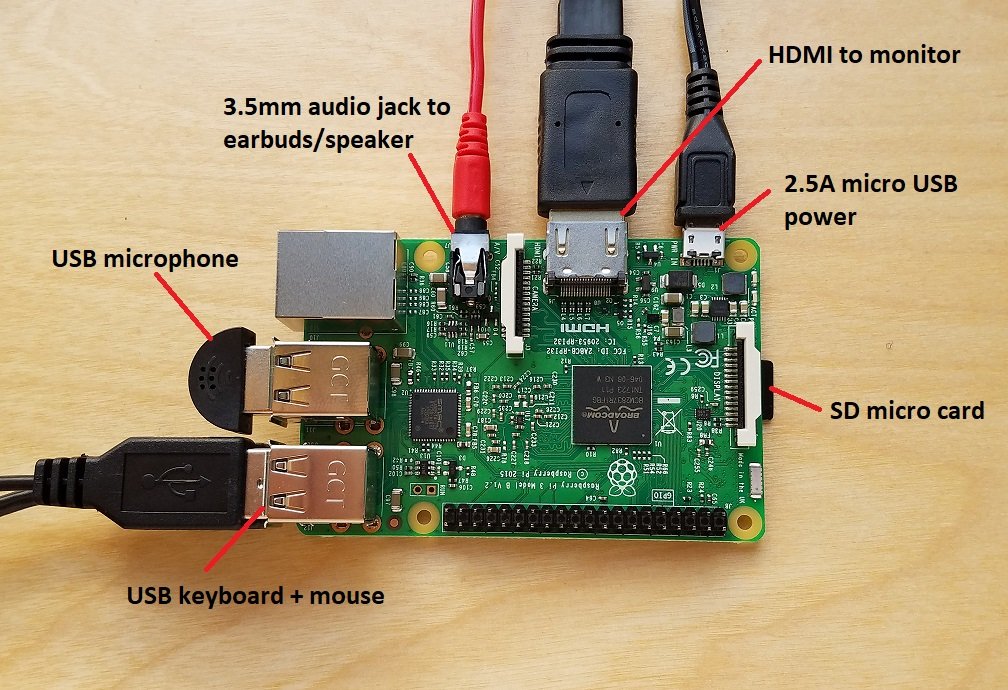
- you need a Raspberry Pi of course, along with a suitable power supply – I suggest a 3 B+, or, and A+ with a 4-port USB hub so you can connect your peripherals for all the setup work…though very popular, I had not yet implemented an RPi…an RPi is really a miniature full-blown computer as opposed to the micro-controller (MCU) based products I had used in the past, such as my recent experience with the Arduinos and previous experience with the MCU chips themselves while developing the RockeTiltometer…at the time, the most powerful RPI was the 3 B+, so I went with that for this first project…
- you need an operating system (OS) for the RPi…most of the tutorials and blogs I had seen used a flavor of Linux called Raspbian and since I figured I did not know much about RPi’s, I should try to always choose the path of least resistance, so, I went with the most current version (not always the wisest choice with computer stuff, as I will get into further down-the-road) which at the time was Raspbian Stretch…I also chose not to try to use the Lite version of the OS…use at least an 8GB microSD card…
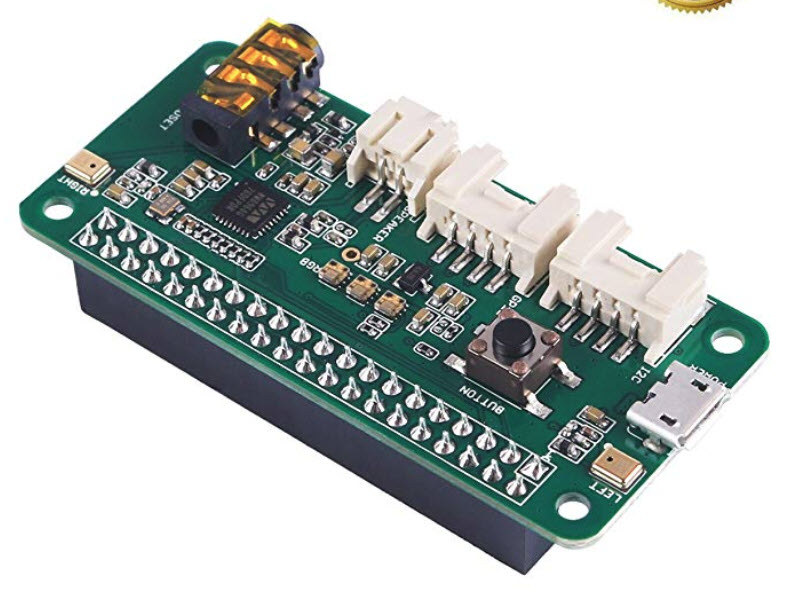
- you will need a USB microphone and an external speaker with a 3.5mm plug, or a USB headphone/mic combination, or, you may want to go with a “hat” for the RPi which includes a set of microphones and an output for the speaker – the hat will provide a less cluttered setup and superior open-environment, untethered performance…I struggled most with the audio aspect of setting up the RPi, so I strongly suggest looking at, starting with, the Respeaker 2-mic Pi Hat for the audio input/output (more later)…
- though the RPi can work well headless (using a service called SSH), I suggest when starting the development to use a keyboard, mouse and monitor – it will make life much simpler…the RPi has an HDMI output so it should work with whatever monitor you have available…
- you will need your own computer to facilitate the build…if you have a monitor (most monitors now have multiple inputs that you can cycle between), keyboard and mouse, you should be able to gather the rest of the pieces needed for the AlexaPi project for less than $100…
If you follow the tutorial referenced above, you should be able to build your AlexaPi quite handily – it is a pretty cool experience to have your own, custom made personal assistant!
Issues/Tips. The only real issue I had during the build was with the audio – it took quite a bit of futzing around for me to get the USB mic and speaker working properly…eventually, I just installed the Respeaker hat and had much better luck…
- Setting up your RPi:
- I would use the image install rather than NOOBS – I think it is pretty straight-forward – instructions are here…
- I would download balenaEtcher and the actual image…if you use the RPi 3 B+, direct connect the ethernet RJ connector to your network before you start the RPi – it will make things go more quickly with initial OS updates and such, and will automatically guide you to set up your WiFi connection so you can disconnect your direct connection…you can use your PC’s terminal to then WiFi connect to the RPi via SSH…install PuTTY on your PC to establish initial WiFi SSH connection to the RPi – before you do that, go into the RPi Desktop Preferences menu and enable SSH
- while in the Preferences menu, make sure that SPI, I2C, and Serial are enabled; also you may want at this time to Expand Filesystem, though a dedicated AlexaPi should not need the extra space
- you should set up a static IP address for your WiFi or ethernet connection by editing the dhcpcd.conf file
- I would download balenaEtcher and the actual image…if you use the RPi 3 B+, direct connect the ethernet RJ connector to your network before you start the RPi – it will make things go more quickly with initial OS updates and such, and will automatically guide you to set up your WiFi connection so you can disconnect your direct connection…you can use your PC’s terminal to then WiFi connect to the RPi via SSH…install PuTTY on your PC to establish initial WiFi SSH connection to the RPi – before you do that, go into the RPi Desktop Preferences menu and enable SSH
- I would use the image install rather than NOOBS – I think it is pretty straight-forward – instructions are here…
sudo nano /etc/dhcpcd.conf (change address parameters to fit your network)

at end of file:

interface eth0

static ip_address=192.168.0.10/24
static routers=192.168.0.1
static domain_name_servers=192.168.0.1

interface wlan0

static ip_address=192.168.0.200/24
static routers=192.168.0.1
static domain_name_servers=192.168.0.1
- you can also set up your WiFi connection if something happens during your initial install that misses it by editing your wpa_supplicant.conf file
sudo nano /etc/wpa_supplicant/wpa_supplicant.conf (change testing to your SSID)network={country=USssid="testing"psk="testingPassword"}
- If you use the Respeaker hat, use the instructions here and you should be OK…
- run aplay-l and arecord -l in the terminal of the RPi – you should get something like this:
pi@raspberrypi:~$ aplay -l
**** List of PLAYBACK Hardware Devices ****
card 0: ALSA [bcm2835 ALSA], device 0: bcm2835 ALSA [bcm2835 ALSA]
  Subdevices: 8/8
  Subdevice #0: subdevice #0
  Subdevice #1: subdevice #1
  Subdevice #2: subdevice #2
  Subdevice #3: subdevice #3
  Subdevice #4: subdevice #4
  Subdevice #5: subdevice #5
  Subdevice #6: subdevice #6
  Subdevice #7: subdevice #7
card 0: ALSA [bcm2835 ALSA], device 1: bcm2835 ALSA [bcm2835 IEC958/HDMI]
  Subdevices: 1/1
  Subdevice #0: subdevice #0
card 1: seeed2micvoicec [seeed-2mic-voicecard], device 0: bcm2835-i2s-wm8960-hifi wm8960-hifi-0 []
  Subdevices: 1/1
  Subdevice #0: subdevice #0

pi@raspberrypi:~$ arecord -l
**** List of CAPTURE Hardware Devices ****
card 1: seeed2micvoicec [seeed-2mic-voicecard], device 0: bcm2835-i2s-wm8960-hifi wm8960-hifi-0 []
  Subdevices: 1/1
  Subdevice #0: subdevice #0
pi@raspberrypi:~/seeed-voicecard $- note that the seeed-2mic-voicecard is card 1 in both lists – if that is the case, then you can use this command in the terminal to check operation:
arecord -D plughw:1,0 -d 3 test.wav && aplay test.wav- this will record your mic for 3 seconds and then replay through the speaker – make sure to click the speaker icon in your RPi Desktop and see that the volume control is up above 50% or so, also, right-click the icon and be sure that Analog is checked for your speaker output…
- if your arecord -l and aplay -l listing indicate a different card number, e.g., 0 for your installed devices, or if you use something other than the Respeaker unit, change the audio-testing command above to correspond, e.g.,
arecord -D plughw:0,0 -d 3 test.wav && aplay test.wavalso if you are still having issues, you can try editing your asound.conf file:
sudo nano /etc/asound.conf (assuming you found your card to be card 1)

pcm.!default {
        type asym
        playback.pcm {
          type plug
          slave.pcm "hw:1,0"
        }
        capture.pcm {
          type plug
          slave.pcm "hw:1,0"
        }
}

ctl.!default {
        type hw
        card 1
}
So, there you have my suggestions when making an AlexaPi – I think it is worth doing for the experience and fun – it is really cool, but, once I got it up and running and looked further, the Alexa Gadget route was a dead-end – there is currently a very limited set of Alexa Gadget interfaces and nothing allowing a direct path to send robot commands…maybe down the road, but for now I needed to find something else…
[UPDATE: Since writing this guide, Amazon has announced the Custom Interfaces feature for Alexa Gadgets…now you can create code that will allow the Echo device to directly communicate with another device, effectively doing the same function as the GooglePI application that I outlined elsewhere on this site – however, as with the Google Assistant, with the AlexaPI Assistant, you are limited to the canned wake/trigger/hotwords provided by Amazon…]
