I wanted to be sure that the robot had some personality…the obvious thing to me was to use LEDs somehow to create that “robot” feeling…I went to the SparkFun web site and searched LEDs…I had been thinking of using strips of LEDs on the robot…I saw lots of those and also some LED circles, but then I saw something that piqued my interest – an LED matrix – how about using a matrix to create a face that I could also control with the action-results, i.e., maybe make the robot smile, frown – maybe even create talk animations while he was speaking…
I saw NeoPixels…they use a combination of Red/Green/Blue (RGB) LEDs, along with a miniature micro-controller to allow individually addressing a group of LEDs connected to a bus…your controller spits out serial data that addresses the individual LED, telling it what color to represent and how bright it should be! Rather than having to use a slew of I/O pins to address the indivdual LEDs in an 8×8 matrix, you can just provide power and a data wire to the matrix – very clean and simple…

Upon investigation I learned that the RPi did not have the timing required to connect to the NeoPixels, I was disappointed but thought maybe I could have the RPi talk to an Arduino and still be able to have a face…some more searching and I found Adafruit’s DotStars – same notion, but they did not require the timing of the NeoPixels…the variety of output to the DotStars is amazing, but I just needed a simple face and they suited the purpose just fine…
I got a matrix from Adafruit and, since I had the FastLED library already my Arduino IDE, I used an example .ino file to play with the matrix connected to an Arduino Uno and determined that I could do what I wanted (see code snippet below)…
// Arduino test code for Adafruit DotStar 8 x 8 matrix
#include <FastLED.h>

// How many leds in your strip?
#define NUM_LEDS 64

#define DATA_PIN 16
#define CLOCK_PIN 17

// Define the array of leds
CRGB leds[NUM_LEDS];

void setup() {
      FastLED.addLeds<DOTSTAR, DATA_PIN, CLOCK_PIN, RGB>(leds, NUM_LEDS);
      // USE CAUTION - EACH LED DRAWS LOTS OF CURRENT!!
      LEDS.setBrightness(12);
}

void loop() {
  // Turn the LED on, then pause
  // Left eye
  leds[8] = CRGB::Red;
  leds[9] = CRGB::Red;
  leds[16] = CRGB::Red;
  leds[17] = CRGB::Red;

  // Right eye
  leds[40] = CRGB::Red;
  leds[41] = CRGB::Red;
  leds[48] = CRGB::Red;
  leds[49] = CRGB::Red;

  // Main mouth
  leds[20] = CRGB::Red;
  leds[21] = CRGB::Red;
  leds[28] = CRGB::Red;
  leds[29] = CRGB::Red;
  leds[36] = CRGB::Red;
  leds[37] = CRGB::Red;
  leds[44] = CRGB::Red;
  leds[45] = CRGB::Red;

  // Corners - smile
  leds[6] = CRGB::Black;
  leds[13] = CRGB::Black;
  leds[53] = CRGB::Black;
  leds[62] = CRGB::Black;

  leds[3] = CRGB::Red;
  leds[12] = CRGB::Red;
  leds[52] = CRGB::Red;
  leds[59] = CRGB::Red;
  FastLED.show();
  delay(3000);
  // Now turn the LED off, then pause
  // Corners - smile
  leds[3] = CRGB::Black;
  leds[12] = CRGB::Black;
  leds[52] = CRGB::Black;
  leds[59] = CRGB::Black;

  leds[6] = CRGB::Red;
  leds[13] = CRGB::Red;
  leds[53] = CRGB::Red;
  leds[62] = CRGB::Red;
  FastLED.show();
  delay(3000);
}
One word of caution – when you are playing with multiple LED strips or matrices, kept in mind that each NeoPixel or DotStar contains three LED elements plus the micro-controller, so they each draw a lot of current…some of the example files run all of the LEDs simultaneously, so be sure you are aware of the total potential current draw and provision/avoid accordingly!!
Once I determined I could do a face on the Arduino, I downloaded the necessary CircuitPython and DotStar libraries (see below) to my RPi, found example Python code for the matrix, created a Python script and loaded it into the RPi and ran it – worked great! I was very happy to see that things worked fine and that my robot would have an animated face!
Use these links as reference for getting the libraries/modules downloaded to your RPi: 1st - Link to CircuitPython tutorial (needed to install the DotStar library) 2nd - Link to the DotStar library tutorial Summary of commands to enter into your RPi LXTerminal:sudo apt-get updatesudo apt-get upgradesudo pip3 install --upgrade setuptoolspip3 install RPI.GPIO pip3 install adafruit-blinkasudo pip3 install adafruit-circuitpython-dotstar(Note: Be sure that you enabled I2C and SPI during your RPi setup...)
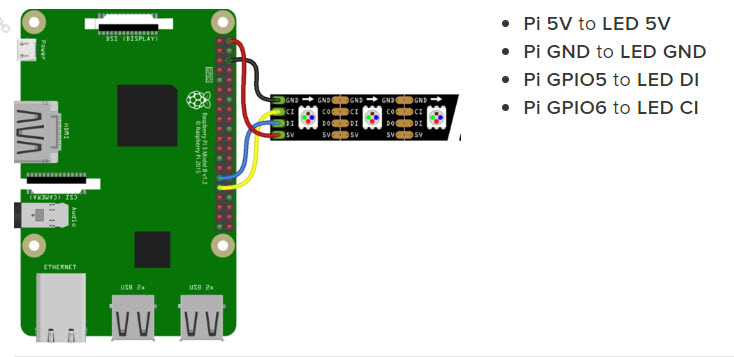
In the event that you decide to use a Respeaker 2-mic Pi Hat on the RPi , note that it makes accessing the GPIO pins of the RPi difficult, however, they do bring out pins 12 and 13 to a connector that is set up to use a Grove module…since I needed two pins to run the DotStar matrix, I simply needed to get a Grove cable to bring the I/O pins to the matrix…the matrix however uses 5-volt power – the Grove connector on the Pi Hat furnishes 3.3-volt power, so, in order to “level-shift”, I soldered the wire on the 5-volt pad of the matrix to one of the 5-volt header pins of the Pi Hat…
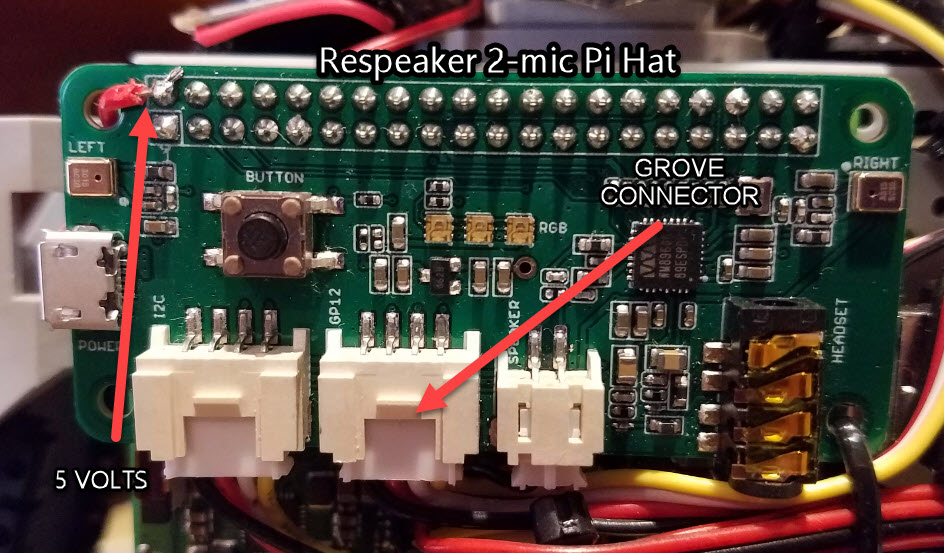
| Grove Connector | Wire Color | Matrix Pad |
| GND | Black | GND |
| +3.3V (not used) | Red | +5V (to RPi +5V) |
| GPIO13 | White | CI |
| GPIO12 | Yellow | DI |
