[update July, 2025] Well, I tried firing up the bot after a few years of gathering dust in the corner of my office since the grandkids has expressed an renewed interest…hmmm, this should be interesting, right? I charged up the batteries and turned things on – LEDs blinked and such but I got no response from the bot – apparently too much time had elapsed and all the software had soured – what to do now…
I made a survey of availableapplications out there that might do the job of allowing me to voice-direct text/hex output into the bot’s computer…some of the old voice assistants had either folded or had been assumed, but others were still around – but, it seems that the honeymoon phase where they were allowing access to hobbyist had gone away. Now you had to pay stiff monthly fees to access the tech. What to do.
Thinking maybe I could try using some direct Arduino-based approach, I stumbled across the Arduino Cloud. This is a web based application that allows you to interface and control specific Arduino devices for IoT, smart home, etc. I noticed that they allowed an interface to Amazon’s Alexa devices which was an early target of mine during the initial development of the Bioloid Premium. There is a monthly fee for using the site but it is small so doable…
This description will be brief since the basic approach is similar to the SNIPS and other applications and the Arduino Cloud site is relatively straight forward in guiding you through setting up the Alexa method…
Again, what’s happening here is that we ask Alexa (I changed the call word to Ziggy so that he had a more fun name and to avoid all the other Alexa devices I have around the house!) to do something, which in turn causes him to send a command to an Arduino Nano 33 IoT (only certain Arduino models are usable), which in turn sends a hex string to the Bioloid Premium CM-530.
The difficulty turned out to be that unlike when I used a Raspberry Pi as the driver for the CM-530, utilizing one of its USB ports for output to the CM-530’s COM port, the Arduino does not have a true USB port and the CM-530 will not handshake and accept the ASCII strings. I tried and tried many things in software to emulate a port out of the Arduino hardware to no avail. I went out to the community and begged for some help. I got a few hints. I tried going directly to the manufacturer of the Bioloid Premium, Robotis, but never got an answer. eventually, one of the community guys knew someone who knew someone who knew someone – you know how it can go…
Anyway, I got in touch with someone at Robotis who confirmed about the COM handshake issue and also confirmed that the hint from the guy in the community about using a pair of the BlueTooth BT-410 modules should do the trick! So, as in-elegant as it may seem, I constructed a BT connection between the Arduino and the CM-530 and lo-and-behold, I was able to transmit hex packets to the bot!
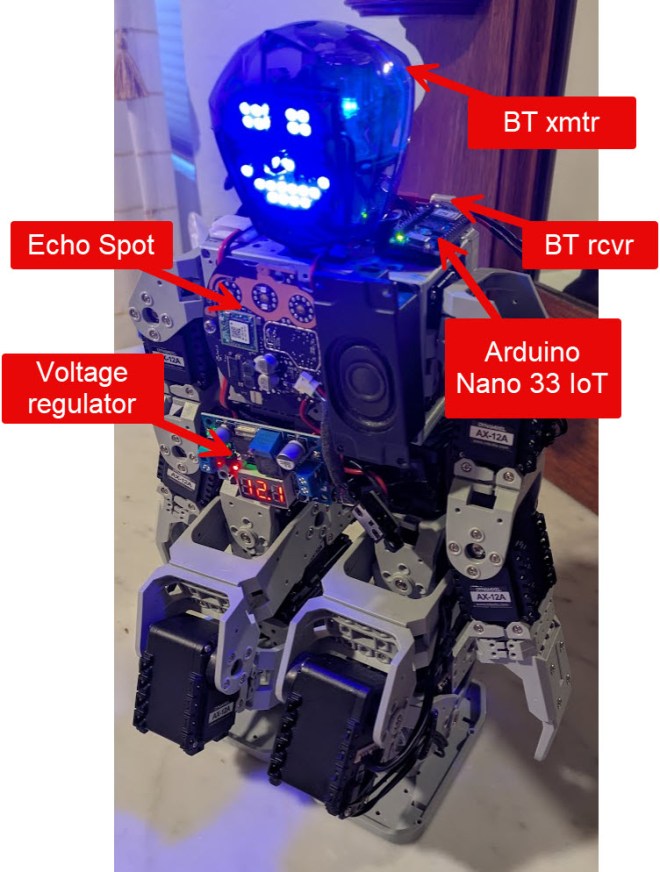
So, from an overview, what I did was to de-construct an Echo Spot and mount it on the bot’s chest…it connects to the Arduino Nano 33 IoT via WiFi through the Arduino Cloud…the Arduino connects to the Bot’s computer via a BT connection which drives the bot’s various actions using it’s built-in pre-scripted movement commands described earlier in this thread.
This is a nice solution for an untethered, voice-directed humanoid robot – you get voice access to the full AI-enabled world of the Amazon Echo Alexa, as well as the ability to command movement and motions into the Robotis Bioloid Premium Robot – this is the solution I was actually looking forward to producing when I started on this journey oh so many years ago! Success!! There is a Comments form at the bottom of this page if you would like to leave a note…
Below is the code that resides in the Arduino Cloud for taking voice direction from the Amazon Cloud and transmitting the selection of available commands I implemented into the bot’s CM-530 controller; I set up the matrix face again but decided not to implement the animated face commands such as wink and smile for this iteration:
/*
  Sketch generated for the Arduino IoT Cloud Thing "Jarvis (Ziggy)"
  https://create.arduino.cc/cloud/things/2710fead-27c0-4e43-ab92-f1c4aa0ab11c

  Arduino IoT Cloud Variables description

  The following variables are automatically generated and updated when changes are made to the Thing

  CloudSwitch bow;
  CloudSwitch cheer;
  CloudSwitch hand_stand;
  CloudSwitch led_D13;
  CloudSwitch move_back;
  CloudSwitch move_forward;
  CloudSwitch move_left;
  CloudSwitch move_right;
  CloudSwitch pound_chest;
  CloudSwitch push_up;
  CloudSwitch salute;
  CloudSwitch sideways_left;
  CloudSwitch sideways_right;

  Variables which are marked as READ/WRITE in the Cloud Thing will also have functions
  which are called when their values are changed from the Dashboard.
  These functions are generated with the Thing and added at the end of this sketch.
*/

// 10-17-24  FBH  0.1  initial setup
// 12-05-24       0.2	added face
// 12-13-24       0.3	cleanup and add movement stop intervals
// 12-23-24       1.0	cleanup; release

#include "thingProperties.h"

// for the face LED matrix
// actually just using a sequence of LEDs constructed into an 8x8 sepentine matrix
#include <LedControl.h>

// for onboard LED for diagnostics
const int ledPin = 13;
int COUNTER1 = 0;
const long interval = 500;  // delay in milliseconds for LED extinguish

// for various robot motion command execution restriction delays
const long interval1 = 1000;  // delay in milliseconds for robot movement command cease
const long interval1_5 = 1500;
const long interval2 = 2000;

// soft SPI for controlling the face LEDs
#define NUM_DEVICES 1
#define DATA_IN_PIN 4
#define CS_PIN      5
#define CLK_PIN     6

// create an instance of the LedControl class
LedControl lc = LedControl(DATA_IN_PIN, CLK_PIN, CS_PIN, NUM_DEVICES);

// set up smiling face pattern
byte smiling[8] = {
  B00000100,
  B11000010,
  B11000011,
  B00001011,
  B00001011,
  B11000011,
  B11000010,
  B00000100
};

void setup() {
  // for the onboard feedback LED which helps to see if voice commands registered
  pinMode(ledPin, OUTPUT);

  // Wake up the MAX7219 from power-saving mode
  lc.shutdown(0, false);
  // Set brightness level (0 is min, 15 is max)
  lc.setIntensity(0, 8);
  // Clear the display
  lc.clearDisplay(0);

  // Display the face
  for (int row = 0; row < 8; row++) {
    lc.setRow(0, row, smiling[row]);
  }

  // Initialize serial and wait for port to open:
  Serial1.begin(57600);  // bot speed
  // This delay gives the chance to wait for a Serial Monitor without blocking if none is found
  delay(interval1_5);

  // Defined in thingProperties.h
  initProperties();

  // Connect to Arduino IoT Cloud
  ArduinoCloud.begin(ArduinoIoTPreferredConnection);

  /*
     The following function allows you to obtain more information
     related to the state of network and IoT Cloud connection and errors
     the higher number the more granular information you’ll get.
     The default is 0 (only errors).
     Maximum is 4
 */
  setDebugMessageLevel(2);
  ArduinoCloud.printDebugInfo();

}


void loop() {
  ArduinoCloud.update();
}

// actions
void onPoundChestChange()  {
  if (pound_chest == 1) {
    // send one set of instructions to robot then hand off to delay for reset to ready state
    do {
      // send command to bot
      byte action_chest[] = {0xFF, 0x55, 0x21, 0xDE, 0x00, 0xFF};
      Serial1.write(action_chest, 6);
      digitalWrite(ledPin, HIGH);
      COUNTER1 = 1;  // use to limit robot instructions to one set of sequences
    }
    while (COUNTER1 == 0);
    delay(interval);
    digitalWrite(ledPin, LOW);
    COUNTER1 = 0;
  }
  else  {
    digitalWrite(ledPin, LOW);
  }
}

void onMoveForwardChange()  {
  if (move_forward == 1) {
    // send one set of instructions to robot then hand off to delay for reset to ready state
    do {
      // send command to bot
      byte action_forward[] = {0xFF, 0x55, 0x01, 0xFE, 0x00, 0xFF};
      Serial1.write(action_forward, 6);
      digitalWrite(ledPin, HIGH);
      COUNTER1 = 1;  // use to limit robot instructions to one set of sequences
    }
    while (COUNTER1 == 0);
    delay(interval2);
    byte action_stop[] = {0xFF, 0x55, 0x00, 0xFF, 0x00, 0xFF};
      Serial1.write(action_stop, 6);
    digitalWrite(ledPin, LOW);
    COUNTER1 = 0;
  }
  else  {
    digitalWrite(ledPin, LOW);
  }
}

void onMoveBackChange()  {
  if (move_back == 1) {
    // send one set of instructions to robot then hand off to delay for reset to ready state
    do {
      // send command to bot
      byte action_back[] = {0xFF, 0x55, 0x02, 0xFD, 0x00, 0xFF};
      Serial1.write(action_back, 6);
      digitalWrite(ledPin, HIGH);
      COUNTER1 = 1;  // use to limit robot instructions to one set of sequences
    }
    while (COUNTER1 == 0);
    delay(interval1);
    byte action_stop[] = {0xFF, 0x55, 0x00, 0xFF, 0x00, 0xFF};
      Serial1.write(action_stop, 6);
    digitalWrite(ledPin, LOW);
    COUNTER1 = 0;
  }
  else  {
    digitalWrite(ledPin, LOW);
  }
}

void onMoveLeftChange()  {
  if (move_left == 1) {
    // send one set of instructions to robot then hand off to delay for reset to ready state
    do {
      // send command to bot
      byte action_left[] = {0xFF, 0x55, 0x05, 0xFA, 0x00, 0xFF};
      Serial1.write(action_left, 6);
      digitalWrite(ledPin, HIGH);
      COUNTER1 = 1;  // use to limit robot instructions to one set of sequences
    }
    while (COUNTER1 == 0);
    delay(interval1_5);
    byte action_stop[] = {0xFF, 0x55, 0x00, 0xFF, 0x00, 0xFF};
      Serial1.write(action_stop, 6);
    digitalWrite(ledPin, LOW);
    COUNTER1 = 0;
  }
  else  {
    digitalWrite(ledPin, LOW);
  }
}

void onMoveRightChange()  {
  if (move_right == 1) {
    // send one set of instructions to robot then hand off to delay for reset to ready state
    do {
      // send command to bot
      byte action_right[] = {0xFF, 0x55, 0x09, 0xF6, 0x00, 0xFF};
      Serial1.write(action_right, 6);
      digitalWrite(ledPin, HIGH);
      COUNTER1 = 1;  // use to limit robot instructions to one set of sequences
    }
    while (COUNTER1 == 0);
    delay(interval1_5);
    byte action_stop[] = {0xFF, 0x55, 0x00, 0xFF, 0x00, 0xFF};
      Serial1.write(action_stop, 6);
    digitalWrite(ledPin, LOW);
    COUNTER1 = 0;
  }
  else  {
    digitalWrite(ledPin, LOW);
  }
}

void onSidewaysLeftChange()  {
  if (sideways_left == 1) {
    // send one set of instructions to robot then hand off to delay for reset to ready state
    do {
      // send command to bot
      byte action_sideLeft[] = {0xFF, 0x55, 0x06, 0xF9, 0x00, 0xFF};
      Serial1.write(action_sideLeft, 6);
      digitalWrite(ledPin, HIGH);
      COUNTER1 = 1;  // use to limit robot instructions to one set of sequences
    }
    while (COUNTER1 == 0);
    delay(interval1_5);
    byte action_stop[] = {0xFF, 0x55, 0x00, 0xFF, 0x00, 0xFF};
      Serial1.write(action_stop, 6);
    digitalWrite(ledPin, LOW);
    COUNTER1 = 0;
  }
  else  {
    digitalWrite(ledPin, LOW);
  }
}

void onSidewaysRightChange()  {
  if (sideways_right == 1) {
    // send one set of instructions to robot then hand off to delay for reset to ready state
    do {
      // send command to bot
      byte action_sideRight[] = {0xFF, 0x55, 0x0A, 0xF5, 0x00, 0xFF};
      Serial1.write(action_sideRight, 6);
      digitalWrite(ledPin, HIGH);
      COUNTER1 = 1;  // use to limit robot instructions to one set of sequences
    }
    while (COUNTER1 == 0);
    delay(interval1_5);
    byte action_stop[] = {0xFF, 0x55, 0x00, 0xFF, 0x00, 0xFF};
      Serial1.write(action_stop, 6);
    digitalWrite(ledPin, LOW);
    COUNTER1 = 0;
  }
  else  {
    digitalWrite(ledPin, LOW);
  }
}

void onPushUpChange()  {
  if (push_up == 1) {
    // send one set of instructions to robot then hand off to delay for reset to ready state
    do {
      // send command to bot
      byte action_pushup[] = {0xFF, 0x55, 0x14, 0xEB, 0x00, 0xFF};
      Serial1.write(action_pushup, 6);
      digitalWrite(ledPin, HIGH);
      COUNTER1 = 1;  // use to limit robot instructions to one set of sequences
    }
    while (COUNTER1 == 0);
    delay(interval);
    digitalWrite(ledPin, LOW);
    COUNTER1 = 0;
  }
  else  {
    digitalWrite(ledPin, LOW);
  }
}

void onHandStandChange()  {
  if (hand_stand == 1) {
    // send one set of instructions to robot then hand off to delay for reset to ready state
    do {
      // send command to bot
      byte action_handstand[] = {0xFF, 0x55, 0x18, 0xE7, 0x00, 0xFF};
      Serial1.write(action_handstand, 6);
      digitalWrite(ledPin, HIGH);
      COUNTER1 = 1;  // use to limit robot instructions to one set of sequences
    }
    while (COUNTER1 == 0);
    delay(interval);
    digitalWrite(ledPin, LOW);
    COUNTER1 = 0;
  }
  else  {
    digitalWrite(ledPin, LOW);
  }
}

void onSaluteChange()  {
  if (salute == 1) {
    // send one set of instructions to robot then hand off to delay for reset to ready state
    do {
      // send command to bot
      byte action_salute[] = {0xFF, 0x55, 0x22, 0xDD, 0x00, 0xFF};
      Serial1.write(action_salute, 6);
      digitalWrite(ledPin, HIGH);
      COUNTER1 = 1;  // use to limit robot instructions to one set of sequences
    }
    while (COUNTER1 == 0);
    delay(interval);
    digitalWrite(ledPin, LOW);
    COUNTER1 = 0;
  }
  else  {
    digitalWrite(ledPin, LOW);
  }
}

void onCheerChange()  {
  if (cheer == 1) {
    // send one set of instructions to robot then hand off to delay for reset to ready state
    do {
      // send command to bot
      byte action_cheer[] = {0xFF, 0x55, 0x24, 0xDB, 0x00, 0xFF};
      Serial1.write(action_cheer, 6);
      digitalWrite(ledPin, HIGH);
      COUNTER1 = 1;  // use to limit robot instructions to one set of sequences
    }
    while (COUNTER1 == 0);
    delay(interval);
    digitalWrite(ledPin, LOW);
    COUNTER1 = 0;
  }
  else  {
    digitalWrite(ledPin, LOW);
  }
}

void onBowChange()  {
  if (bow == 1) {
    // send one set of instructions to robot then hand off to delay for reset to ready state
    do {
      // send command to bot
      byte action_bow[] = {0xFF, 0x55, 0x28, 0xD7, 0x00, 0xFF};
      Serial1.write(action_bow, 6);
      digitalWrite(ledPin, HIGH);
      COUNTER1 = 1;  // use to limit robot instructions to one set of sequences
    }
    while (COUNTER1 == 0);
    delay(interval);
    digitalWrite(ledPin, LOW);
    COUNTER1 = 0;
  }
  else  {
    digitalWrite(ledPin, LOW);
  }
}

// use for command register checking
void onLedD13Change()  {
  if (led_D13 == 1) {
    do {
      digitalWrite(ledPin, HIGH);
      COUNTER1 = 1;  // use to limit robot instructions to one set of sequences
    }
    while (COUNTER1 == 0);
    delay(interval);
    digitalWrite(ledPin, LOW);
    COUNTER1 = 0;
  }
  else  {
    digitalWrite(ledPin, LOW);
  }
}
Leave a comment